I recently decided to start building a drone, to experience and understand more about the technology behind it. After building my 3D printer and understanding about CNC control systems, I wanted to know more how these beasts works, and what you can do with Open Source software and hardware.
I bought a second hand frame, 4 motors and ESC controllers, a battery and a charger and a Flip32 controller. One colleague brought his remote control TX and RX.
Let's start by understanding how the central controller board is working:
There are many types of board and they are classified in number of "DOF" which stands for degrees of freedom. The more DOF you have, the more sensor there is on the board.
3 DOF => one 3 axis accelerometor or gyroscope
6 DOF => one accelerometer + one gyroscope (3 axis)
9 DOF => one accelerometer, one gyro, one three axis compass
10 DOF => same as above + barometer (for altitude sensing)
11 DOF => same as above + GPS
Note: Compass is used for GPS controled flight.
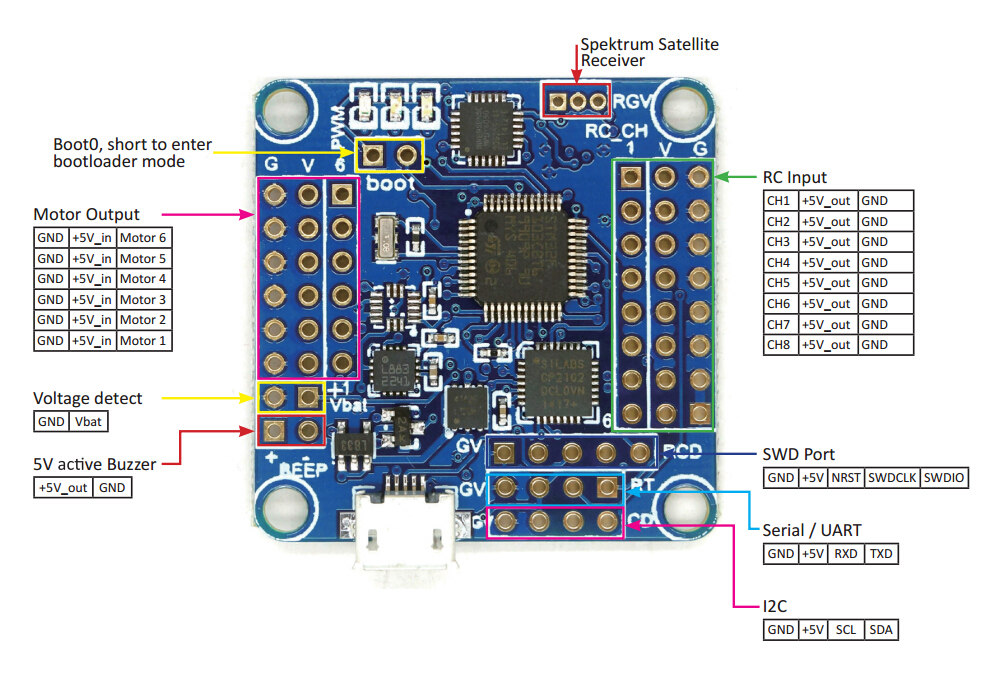
Here is the Pinout of the Flip 32 board, the one I bought from the advice of Daniel, a drone racing fan I met in Sao Paulo's RedBull Station fablab. On the left of the board, you connect the motors
on the right side the remote control canals connectors.
To use your board you need to flash a firmware and calibrate all the sensors. This is pretty simple, but you need to know which software and firmware to choose!
To save some time, let's connect your micro USB cable to your computer and access to CleanFlight.com website. Clean Flight is currently the most active OpenSource software / firmware, compatible with Flip32 board. ---> Very easy to install as it is a chrome App
The first thing you need to do is select the board type: "NAZE" and then the latest stable firmware, download them, and then click on the "Flash firmware" button. That's about it!
Selecting the board + Firmware version

Flashing the firmware

Once you've done it, simply click on Connect, and you should be able to move your board while seeing it in 3D on CleanFlight. You are ready for calibration process (hopefully on the next post)
I bought a second hand frame, 4 motors and ESC controllers, a battery and a charger and a Flip32 controller. One colleague brought his remote control TX and RX.
Let's start by understanding how the central controller board is working:
There are many types of board and they are classified in number of "DOF" which stands for degrees of freedom. The more DOF you have, the more sensor there is on the board.
3 DOF => one 3 axis accelerometor or gyroscope
6 DOF => one accelerometer + one gyroscope (3 axis)
9 DOF => one accelerometer, one gyro, one three axis compass
10 DOF => same as above + barometer (for altitude sensing)
11 DOF => same as above + GPS
Note: Compass is used for GPS controled flight.
Here is the Pinout of the Flip 32 board, the one I bought from the advice of Daniel, a drone racing fan I met in Sao Paulo's RedBull Station fablab. On the left of the board, you connect the motors
on the right side the remote control canals connectors.
To use your board you need to flash a firmware and calibrate all the sensors. This is pretty simple, but you need to know which software and firmware to choose!
To save some time, let's connect your micro USB cable to your computer and access to CleanFlight.com website. Clean Flight is currently the most active OpenSource software / firmware, compatible with Flip32 board. ---> Very easy to install as it is a chrome App
The first thing you need to do is select the board type: "NAZE" and then the latest stable firmware, download them, and then click on the "Flash firmware" button. That's about it!
Selecting the board + Firmware version

Flashing the firmware

Once you've done it, simply click on Connect, and you should be able to move your board while seeing it in 3D on CleanFlight. You are ready for calibration process (hopefully on the next post)
Commentaires
Enregistrer un commentaire
Tell me what you think